Friday, July 27, 2012

Blueberry Cheese Cake

This is the my second attempt baking this cheesecake after my first success. I've been baking lately but could never find the time to blog and post my baking adventure. Personally I feel baking cheese cake is the easiest since its so versatile and even if you make any mistakes, the cake wouldn't turn out inedible. Here's my recommended recipe for those who need a quick and easy way to bake a cheese cake. 

My first attempt - looking nice and I'm so thrilled


Second Attempt - Still looking good, hehe

INGREDIENTS
120g digestive or marie biscuits
75g butter, melted

750g cream cheese
210g sour cream
150g granulated sugar
1 tsp vanilla essence
250g blueberry fillings
1 tsp lemon juice, optional
3 eggs

METHOD
1. Crush the biscuits into crumbs, finely or coarsely depending on your likings. I prefer a more rough texture, so that I can taste the biscuits. Pour in the butter and mix well.
2. Press the crumbs into a 8 inch spring pan as the base and set aside.
3. In bowl of an electric mixer, mix cream cheese with sugar until smooth. 
4. Then mix in the eggs one at a time, mixing just enough to incorporate. 
5. Finally mix in the sour cream, vanilla essence and lemon juice until smooth. 
6. Pour the cream cheese filling into the prepared crust. Drop some blueberry fillings randomly on top of the cheese cake, and swirl using a fork.
Note: If you want some blueberry fillings in the cake, you may fill half of the cream cheese and spread some blueberry in between before filling the remaining cream cheese.
7. Bake the cheesecake in a preheated 165 Celsius oven using the water bath method for 60 minutes. Let the cake cool slightly in oven with the door ajar for about 15 minutes to prevent cracking. The top layer will appear slightly brownish, just perfect.
8. Chill in refrigerator for at least 4 hours before serving. 


Saturday, July 21, 2012

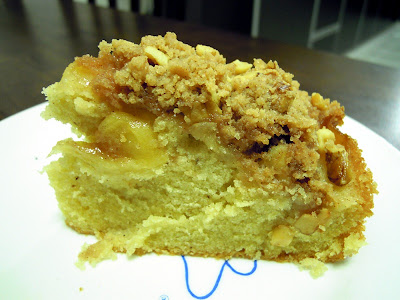
Apple Crumble Cake

I've always wanted to try baking an apple crumble cake. When I have some red apples sitting in the fridge for too long, this recipe comes across my mind. Hmm, Granny smith apples? For newbie like me, I don't have the slightest idea why it's named like that in the recipe. Well, that name refers to no other than green apples. I think many recipes call for green apple instead of the red one because it's more crunchy and the slight sourness of the fruit can bring the extra flavor in the end-baked products. But mine turned out not bad after all, even using red apples ;-)


INGREDIENTS

Part A - Apple topping
20g butter
100g granulated sugar
3 green apples, peeled, cored and cut into 1/2 inch thick wedges. ( I used Fuji red apples)

Part B - Crumb topping
115g butter, melted
100g brown sugar
150g granulated sugar
1 tsp cinnamon powder
110g plain flour
1 cup walnut, toasted

Part C - Cake
80g butter
150g granulated sugar
2 eggs, grade A 
110g cake flour
1 tsp baking powder
1/4 tsp table salt
1 tsp cinnamon powder
1/2 tsp ginger powder

METHOD
1. Start by completing part A and B first before moving to part C.
2. For part A, melt the butter over medium-heat fire on a medium size pan. Add in the sugar and continue cooking until the sugar is dissolved and fragrant. Finally add in the apple and continue to cook until the apples have softened slightly. Remove from heat and cool to room temperature.
3. Part B is the easiest. Whisk together flour, both sugars, walnut, cinnamon powder and salt in a medium bowl. Add melted butter and using your fingers, mix together to form large crumbs.  Set aside for use later.
4. For Part C, making the cake. In a large bowl, whisk together flour, baking powder, ginger powder, cinnamon powder and salt. Then cream together butter and sugar until light and fluffy for about 2 to 3 minutes. Add the eggs and mix until well combined. Finally using a spatula, fold in the flour mixture and mix slowly until well combined. Do not overmix, else the cake will have  a rough texture.
5. Pour the cake mixture into a 8 inch spring pan and spread evenly. Take the apple slices and layer them over the top of the cake, overlapping them slightly so that they're in one thin layer covering the entire surface of the cake.
6. Finally, sprinkle all the crumbs onto the cake as toppings. Bake the cake in a pre-heated oven at 170 Celsius for about 60 minutes or until skewer comes out clean.
7. Remove from oven and let cool completely before serving.


Tuesday, June 5, 2012

Banana Cake

Popularly known as 'pasar malam' banana cake, this self made cake definitely beats the odd in having the rich original banana smell rather than those mass produced cake in hypermarket which is too vanilla flavored for me.  In case you have too much banana to handle, this is definitely the recipe to go. Enjoy!


INGREDIENTS
200g ripe banana (pisang emas or berangan)
70g brown sugar
2 eggs
1 tsp emulsifier
125g cake flour
1/2 tsp baking soda
1/2 tsp baking powder
60ml milk
50ml corn oil

METHOD
1. Beat the banana with sugar until combined with an electric hand-mixer. Add in the eggs and continue to beat until combined.
2. Add in the emulsifier and beat for about 5 minutes until fluffy.
3. Add in the baking powder and baking soda. Alternating with milk and flour, slowly fold into the batter and combined well.
4. Fold in the corn oil lastly.
5. Pour the batter into a lined, 9"x5" loaf pan. (I use a smaller loaf pan, resulting a rise loaf)
6. Bake for 30 minutes in a preheated oven at 200 Celsius or until skewer comes out clean.
7. Cool on a wire rack and enjoy.


Wednesday, March 28, 2012

Morgan Stand Mixer

Finally, I got my first stand mixer from Groupon with a reduction of 47% from the original price RM1,326.
At RM699, it's sure a bargain looking at it in terms of design and speed. But I guess its gonna be noisy as compared to my dream mixer, KitchenAid.
Gotta spend more time in baking from now on.


Wednesday, March 21, 2012

Castella Cake

The name of this cake really caught my attention when I was hunting for a quick and esay recipe. Castella (カステラ Kasutera) is a popular Japanese sponge cake made of sugar, flour, eggs and starch syrup. You will see many adaptations of this recipe into green tea, chocolate or even cream cheese due to its simple and natural texture for experimentation. Well I haven't try to create my own recipe yet and  this is my first attempt using the recipe from AnnCoo. Well, I must say this cake really taste nice and not too filling for a second piece.

INGREDIENTS
4 large eggs
80g castor sugar
75g milk
60g wild honey
10g cake emulsifier
55g bread flour
90g plain flour
a pinch of salt (optional)
50g butter, melted

METHOD
1. Sieve the bread and plan flour twice and keep aside.
2. Using a electric hand-mixer, beat the egg, sugar and emulsifier in a medium bowl for about 10 minutes until thick and creamy white.
3. Add in the flour bit by bit alternating with milk and combine well using a whisk or spatula..
4. Lastly add in wild honey and butter in batches and combine until even.
5. Pour the batter into two medium loaf pan and bake in a pre-heated 160 Celsius oven for 40 minutes.
6. Cool on wire rack and enjoy.


Sunday, February 26, 2012

Chocolate Walnut Cake

Sometimes I felt I'm such a lazy person when it comes to baking. I intended to bake a banana cake this weekend but ended up baking this chocolate walnut cake instead because I don't want to drive all the way to the market to just buy a few bananas. This cake still have the banana texture but with Cadbury chocolate flavors ;-) 


INGREDIENTS
PART A
150g butter
30g brown sugar
1 tsp vanilla essence
4 egg yolks

PART B
4 egg whites
80g castor or granulated sugar
1/4 tsp cream of tartar

PART C
90g cake flour
1/2 tsp baking powder

PART D
40g walnut, toasted and crushed
80g Cadbury chocolate grated, store in fridge to avoid melting.
 
METHOD
1. Prepare all the ingredient parts and lined a 6" round cake pan.
2. Start with part A ingredients, i.e. cream the butter, brown sugar and vanilla essence until smooth and pale using a electric hand-mixer. Add in the egg yolks and beat until combined.
3. Beat the part B ingredients i.e. egg whites, sugar and cream of tartar until stiff peaks form. Fold the egg whites into batter (A).
4. Sift part C ingredients and fold into the mixture slowly.
5. Finally add in part D ingredients and mix until even.
6. Bake in a preheated oven at 180 Celsius for 25-30 minutes or until skewer comes out clean.
 

Wednesday, February 22, 2012

Cashewnut Brownie

Brownie is always one of my favorite dessert but I haven't bake one before from scratch except those off-the-shelf pre-packed mixture. I still have one box left on my shelf though, hehe. 
Well, tempted to bake my very own, I tried out this recipe which is adapted from Kevin Chai cook book "AA Touch of Classic Baking". It turns out a bit sweet for me.


INGREDIENTS
140g cooking chocolate
50g brown sugar (to reduce to 20g  if you want a less-sweet brownie)
50g butter
1/2 tbs cocoa powder
1 egg, lightly beaten
1/2 tsp baking powder
40g plain flour
15g white chocolate chips
15g semi-sweet chocolate chips
30g cashew nuts

Notes: For full recipe, double the ingredients and use a 7x7" pan.

METHOD
1. Melt butter, cooking chocolate and coco powder in a medium or large pan over low heat.
2. Stir in brown sugar until almost melted and remove from heat to cool down slightly.
3. Add in eggs and mix well.
4. Preheat your oven at 180 Celsius and lined a 7"x3" loaf pan.
5. Mix the flour and baking powder. Fold flour into the chocolate batter and do not overdo it.
6. Pour and spread the batter into the pan and sprinkle the chocolate chips and cashew nuts over the top.
7. Bake in oven for 25-30 minutes.
8. Serve when cool.